Overview of EXOFAST Inputs Tab
Documentation
Using the Service:- Accessing EXOFAST
- Overview of the Inputs Tab
- Accepted Input File Formats:
- Editing and Plotting Input Files
- Input Parameters and Options
- Output Parameters and Products
- Accessing Previous Results
- Usage Tips and Troubleshooting
Recipe: Run a Simple Fit
Recipe: Run an Advanced Fit
Acknowledgments
The EXOFAST interface contains multiple tabs for entering inputs and previewing, editing, and plotting uploaded data. The EXOFAST Inputs tab is the first and primary tab of the interface where you select or upload source data, enter period and setting inputs, and enter priors.
Refer to the following screenshot to become oriented with the interface:
Click to view larger image in a new window
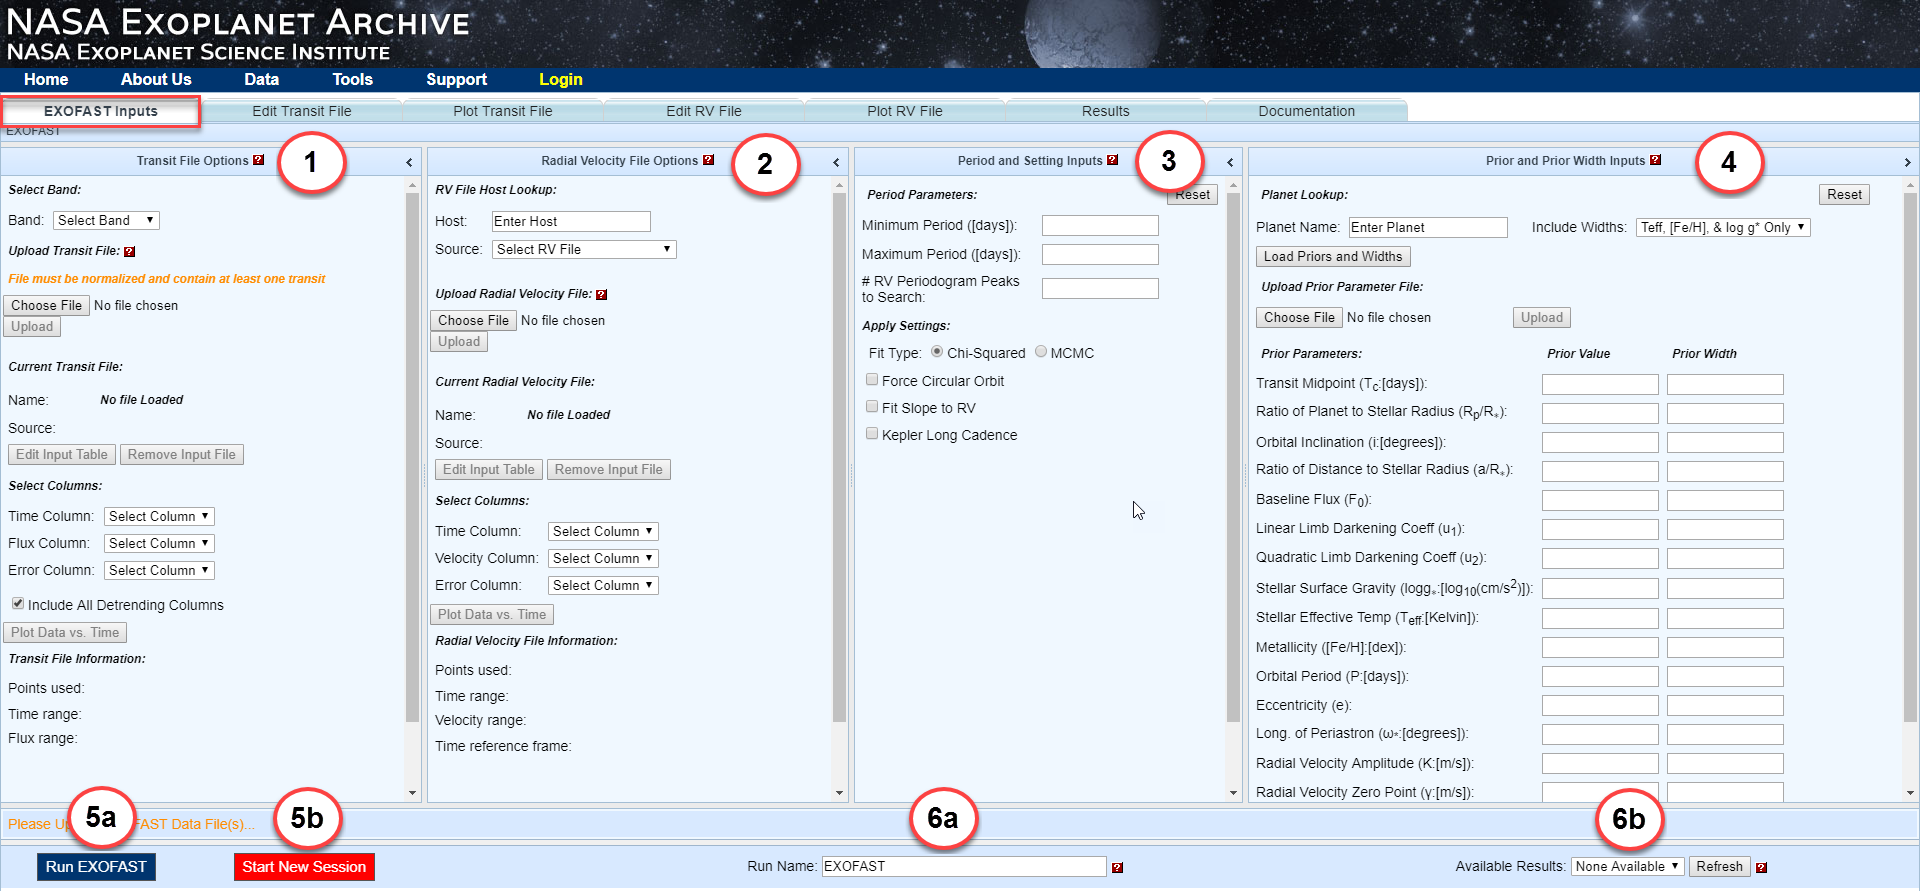
EXOFAST Inputs Tab
 Transit File Options Pane
This is where you select a transit data set from the archive from the Band: drop-down menu and then upload your own transit data as a plain text (.txt) file. (See the Accepted Transit File Formats section for details.) In the absence of a header row, the service initially assigns the first two non-character, non-zero-deviation columns as the time and flux columns, respectively. The third non-character column is assigned as the uncertainty column. If necessary, you may specify alternative columns for time, flux and error. Clicking the Plot Data vs. Time button sends the selected source data to the Plot Transit File tab.
You may also click on the Edit Transit File tab to review your source data and make modifications to it using the interactive table interface.
 Radial Velocity File Options
In this pane, you may either search for data in the archive by entering a host name and selecting an available file, or upload your own data as a plain text (e.g., .txt) file. (See the Accepted RV File Formats section for details.) The service initially selects the first three columns containing numeric values with non-zero standard deviations. If necessary, you may identify alternative columns for time, velocity and error columns.
Clicking the Plot Data vs. Time button sends the selected source data to the Plot RV File tab.
 Period and Setting Inputs
This pane allows you to specify period parameters and other settings for the type of analysis you want to run. You must select either Chi-Squared or MCMC; other settings are optional.
- Force Circular Orbit: This populates the eccentrictiy and longitude of periastron in the Prior and Prior Widths pane, and forces a circular fit.
- Fit Slope to RV: When checked, EXOFAST will fit an additional linear trend to the data, and non-zero RV slope priors are allowed in the prior inputs panel.
- Kepler Long Cadence: When checked, this option generates the transit model by resampling the light curves in 10 equally spaced samples over 29.5 minutes and averaging, corresponding to the timing of Kepler Long Cadence data (see Kipping et al. 2010).
- Period Parameters: When RV data are provided, an RV Lomb-Scargle periodogram is calculated to search for periodicities that can be used as initial guesses for the pre-fitting stages of the EXOFAST algorithm. The Period Parameter options can be used to restrict the search space for these periodicities. For more details, see Period Settings Inputs and the Run an Advanced Fit walk-through.
 Prior and Prior Width Inputs
This pane will load priors and widths from a confirmed planet in the archive, from your own data input file, or from values you manually enter. After entering a planet name, click the Load Priors and Widths button. Otherwise, click Choose File to load a priors parameter file and then click Upload. The values will populate the fields in that pane. (By default, a recommended subset of the prior widths is loaded. You have the option of overriding this subset selection using the Include Widths drop-down menu, but do so with caution. See the Priors section of the EXOFAST Inputs document for details.)
Note that you may save the set of values for a future EXOFAST session by clicking Create Priors Parameter File and then the Download link that appears next to it. Depending on your web browser, it will save the file or display the values in a new tab or window, which can then be copied and pasted into a text file.

 Run EXOFAST Button and
  Start New Session
Click this button when you are ready to run your analysis. Your results will display on the Results tab.
To start a new session in a new browser tab, click Start New Session. All of the data, parameters, settings and priors you have entered will remain in the original tab.
 Customize Session Name and
  Recall EXOFAST Session
EXOFAST automatically saves each analysis as a session so you may recall it in the future. You may customize the session name to make it more memorable or meaningful. If not, sessions are named EXOFAST-nnn with a time and date stamp. To recall a previous session, select it from the drop-down menu. The Refresh button next to Available Results updates the drop-down list to include any EXOFAST sessions run on other browser tabs.
«Previous Accessing EXOFAST Accepted Transit File Formats Next »
Last updated: 20 July 2017