
How to Search Large Data Sets
Skip to a section:
- Overview and System Requirements
- Accessing the Search Interfaces
- Performing A Search
- Time Series Lookup by ID
- List Upload
- Show/Hide the Left Panes
- Adding and Removing Fields (Constraints)
- Known Issues
Overview and System Requirements
The data volume of the UKIRT, KELT, SuperWASP, Kepler Stellar and K2 data sets are too large to be displayed through a web browser, so it's necessary to conduct an initial search of the metadata. This search interface allows you to search for and identify subset(s) of large data sets to view in an interactive table. If you prefer to download all of the data in a given data set, go to the Bulk Download page.
For best results with the search tool, use newer versions of Firefox or Chrome and allow pop-ups. Internet Explorer is not supported at this time.
Accessing the Search Interfaces
Each data set has its own search interface that can be accessed from the Data pull-down from the website menu:
- UKIRT Microlensing Survey
- SuperWASP Light Curves
- KELT Light Curves
- Kepler Stellar
- K2 Targets
Performing a Search
For this example, we use the Kepler Stellar search interface.
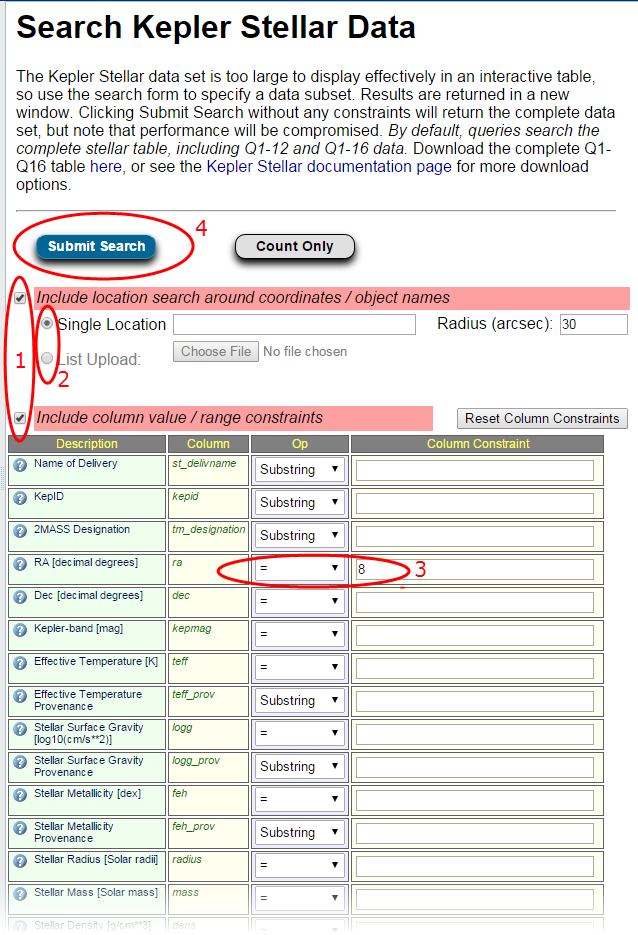
To perform a search:
- Check the box(es) for location search and/or whether to include column value/range constraints.
- Check the radio button for Single Location or List Upload.
- For Single Location, enter the coordinates or an object name in the field provided. Acceptable formats are described in the Search by Object Name or Coordinate section.
- For List Upload, click Browse to locate the input file.
- Enter a radius in arcseconds for either selection.
- If you are including column value/range constraints, select the appropriate operation from the Op column (Logic Operator) and enter the constraint value in the Column Constraint text box. Note that hovering over the
 icon displays the constraints for that particular value. Click the Reset Column Constraints button to reset the constraints form.
 - Conduct a full search by clicking Submit Search.
Note: For string constraints, LIKE/NOT LIKE allows the user the flexibility to specify exact matches, or, using one or more wild card '%' characters, to construct arbitrarily complex patterns constrained to specific locations in the record's value. The Substring constraint is shorthand for a subset of the LIKE functionality that searches for the specified constraint value anywhere in the record value.
When searching by Reference in the Extended Planet Data Search, you may simply enter the first author or bibcode.
Optional: Use the Count Only button to estimate the number of records that meet your search criteria before submitting a query. This interim step may save you some processing time due to the data set's large size. Note: This feature is not available for List Upload.
The search results display in a new browser window, and subsequent searches will display results in new windows. If the results are too large to be viewed effectively in the interactive table, the system will display a message with instructions to download the results for offline viewing.
Additional search parameters can be added from the Column Selection pane.
Search by Object Name or Coordinate
You may also use the Coordinates / Object Name field just above the search form for a single target search. For object names, enter a host name (not a planet) that is resolvable by Simbad, NED and the Exoplanet Archive. For coordinates, the system accepts sexagesimal and decimal degrees. The following examples show the various formats that can be used:
- 17h 44m 34s -27d 59m 13s Equatorial J2000
- 17h44m34s -27d59m13s
- 00h42m44.3s +41d16m08s b1950
- 00:42:44.3 -41:16:08
- 00 42 44.3 -41 16 08 b1983
- 004244.3 -411608
- 17h -27d Equ J2000
- 17h -27d
- 34.5565 54.2321 gal
- 34. 54. ecl
For the sexagesimal coordinate (RA and dec) columns in the results tables, entering just an integer will return all columns matching between that integer and the next. For example, entering 8 in the RA column returns all rows with RA between 8 and 9.
Time Series Lookup by ID
For the surveys with time series data (KELT, SuperWASP, Kepler Stellar and K2), the search interface also allows direct access to the time series for a single object. The input box in the top right of the page allows the user to either generate a download script for the time series for that object, or load the time series into the plotter. The object name entered must be the survey identifier, i.e. for Kepler-10 use the KIC number, which is 11904151. If you do not know the survey identifier, use the Single Location box (link to /docs/search_help.html#howtosearch), which accepts any name for an object. If no time series exist in the archive for the object entered, a system message with this information will be displayed.
List Upload
The List Upload option allows users to submit a simple list of coordinates or host names to return a list of objects within a specified radius. The file should only list one object per line as in the following example; other formats will not be recognized (including files with delimiters, such as commas or tabs).
KIC9244756
19:59:07.13 46:53:25.69
1SWASP J001826.44-523403.6
Download the above example as a sample file.
Note: Lists of coordinates process at a much faster rate than lists of objects. Use coordinates whenever possible.
Output: The results table contains the following data columns:
User List Record: This number matches the result object in the input table with each of its results. For example, the first item in an input file is assigned "1." Each row with a User List Record number of 1 is associated with the first item in the input file, since there may be multiple matches, depending on the specified radius.
User Name: This is the object submitted by the user in the input file; it is either an object name, coordinate, or SuperWASP ID string that was parsed as a coordinate.
User RA and User Dec: These are the resolved coordinates for the User Name.
Match Distance: This is the distance between the User Name and the result object.
Name of Delivery (for Kepler Stellar): This is the data set period (e.g. quarters 1 through 12) from which the result is derived.
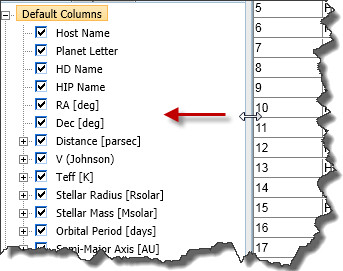
Show/Hide the Left Panes
You may show and hide the left panes containing the Introduction text and Column Selection. Place the cursor on the border between the left panes and the search form until the cursor becomes two arrows (or one, depending on your browser). Then, hold down the left mouse button and drag the border to the left. Release the mouse button when the outline of the pane is in the new location.
Adding and Removing Fields (Constraints)
The search form has a set of default constraints that can be further customized with the Column Selection pane in the lower-left corner of the screen.
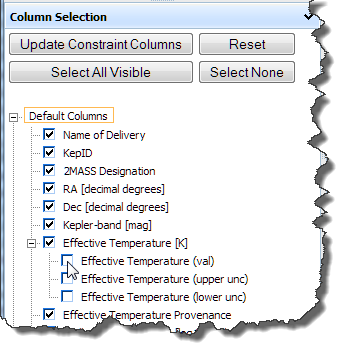
To display additional constraints, click the  icon in the Column Selection pane to expand a menu (if necessary), then select the corresponding checkboxes. Click Update Constraint Columns when finished.
Note that selecting a constraint does not automatically select its subordinate parameters. Each parameter must be selected individually. Click Select All Visible to select all constraints listed, including any within expanded menus. Click Select None to de-select all constraints or Reset to return to the default selections.
Also, all of the Default Columns listed in the Column Selection pane will display in the results table, but not any non-default columns you have selected. To view those parameters in the results table, re-add the column from the results table interface by checking the box and clicking Update.
Known Issues
Issue: Generating wget scripts for search result data products will occasionally trigger the following error:
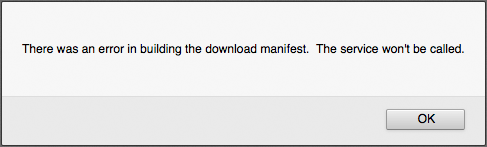
Possible Solution: This is a known issue. Occasionally the communication between the browser and the file system fails, which results in this error. If you receive this error, simply re-submit the query and it should go through.
Last updated: 20 April 2021


![]()
![]()